Set up SSO with SAML 2.0
Connect a SAML 2.0 identity provider, and manage its signing certificates and their rotation.
Last updated 11 days ago
Part of Single sign-on (SSO) for your workspace — step 2 of 3.
SAML 2.0 is the enterprise standard, and the only way in with some identity providers. Setting it up is an exchange: you register three values of Tinct's on your provider, and bring back what describes your provider.
You must be an admin of the workspace, and the workspace must be entitled to single sign-on. If your provider speaks OpenID Connect, that setup has fewer steps.
Before you start
- Verify at least one email domain — Verify your email domain. You can describe the connection first, but you cannot enable it until a domain is verified.
- Have an account on your identity provider that lets you create a SAML application, and an account on a verified domain to run the test sign-in with.
1. Get Tinct's values
- Go to Settings → Security, to the Identity provider card.
- Under Protocol, choose SAML 2.0.
- If no connection exists yet, click Get the values for my provider. (Some providers, Microsoft Entra ID among them, ask for these before they give you anything.)
The card then shows:
- Service provider entity ID (audience)
- Single sign-on URL (ACS)
- Service provider metadata — one document holding them all, with Open and Download
- Our signing certificate — only for a provider that verifies signed requests and wants the certificate pasted rather than read from the metadata
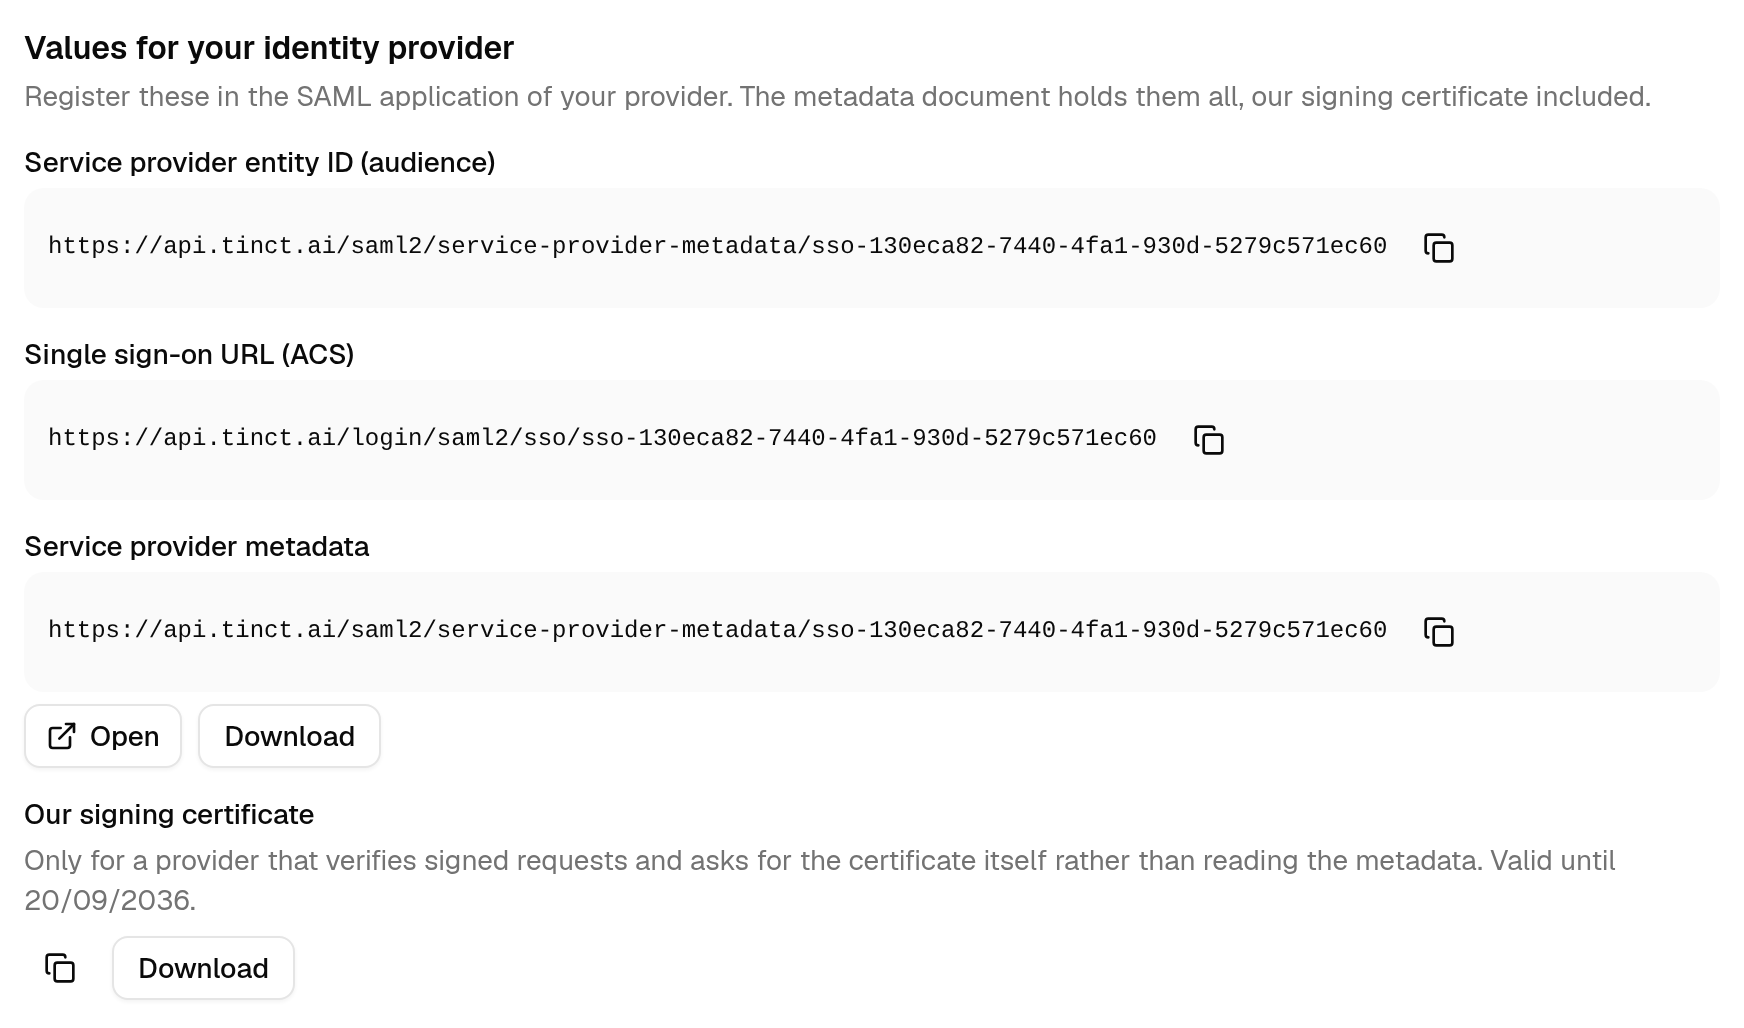
Register these in the SAML application of your provider. Where a provider can import service provider metadata, give it the metadata address and it fills everything in by itself.
What they are called on the common providers:
Tinct always signs the authentication requests it sends. If your provider is set to verify signed requests, give it our signing certificate (or let it read the metadata, which carries it).
Step by step on a given provider: Set up SSO with Keycloak, Set up SSO with Google Workspace, Set up SSO with Okta, Set up SSO with Microsoft Entra ID.
What your provider must send
Most providers get this right once the application is created. When a test sign-in fails, check these first:
- Tinct's entity ID, pasted as is. Whatever your provider calls the field (Entity ID, Audience URI, Identifier, or Client ID on Keycloak), it is not a name you choose. Tinct names itself with this value in every request, and your provider finds the application by it.
- A NameID that never changes: choose the persistent format. Tinct recognises a person by the NameID of the assertion, not by their email address. An email address or a username works too, as long as it never changes: if it does, Tinct no longer recognises the account. A transient NameID changes at every sign-in: Tinct refuses it, and the test sign-in tells you so.
- The email address, as an attribute. Name it
email(or any name listed under Attribute names). Without it, Tinct uses the NameID when it is in email format, and refuses the sign-in when it is not. The address must be on one of your verified domains. - The first and last names, if you want them. As
firstNameandlastName; they name the accounts created at a first sign-in. Nothing else is read: no group, no role. - A signature, SHA-256 or stronger, on the response, on the assertion, or on both, made with a key whose certificate Tinct holds (step 2 takes care of that). SHA-1 is refused.
- A clock on time. An assertion is accepted up to three minutes outside its validity window, no more.
2. Bring your provider's values back
In the same card, under Values from your identity provider, pick how you describe it:
- Metadata URL — the quickest way: the entity ID, the sign-on URL and the certificates are read from it.
- Metadata document — for a provider that only lets you download its metadata. The file is read once and not stored; what it says is saved on the connection.
- By hand — Identity provider entity ID (some providers call it the issuer), Sign-on URL and Signing certificate.
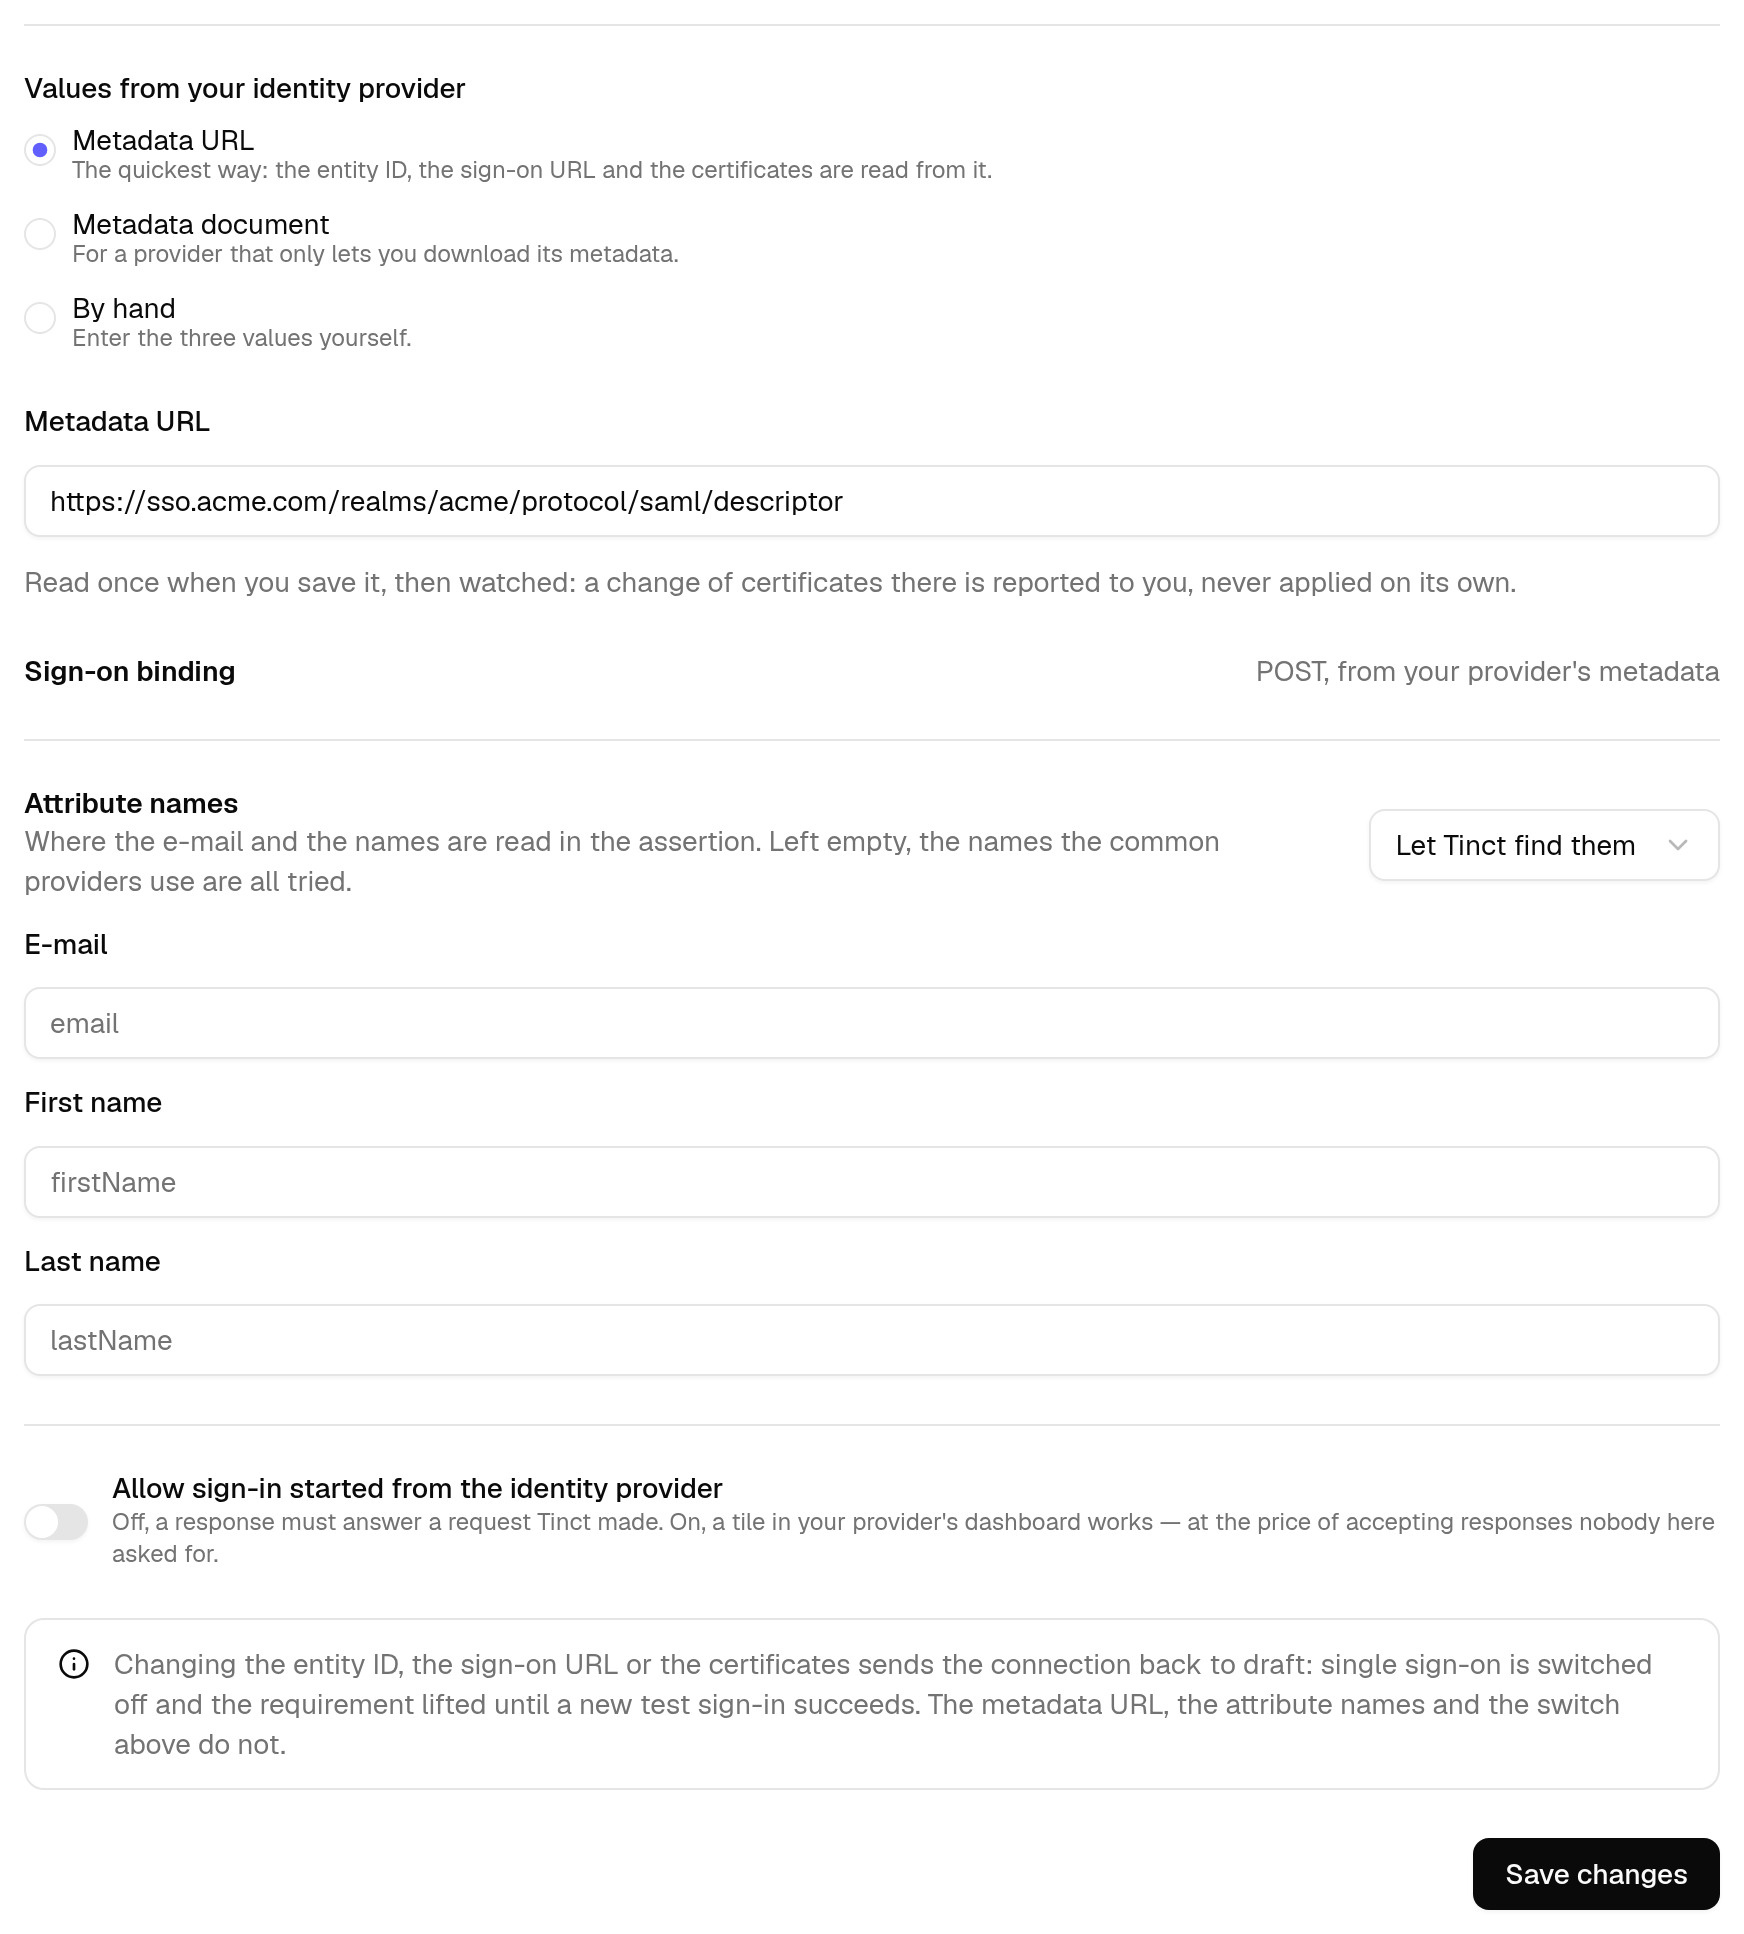
Two settings below are worth a look:
- Sign-on binding — how the authentication request travels to your provider. Redirect suits every common provider, and reading metadata sets it from what the document announces.
- Attribute names — where the email and the names are read in the assertion. Left empty, the names the common providers use are all tried; pick a preset or type your own if your provider uses something else.
Click Save identity provider.
3. Test, then enable
- In the Status card, click Test sign-in. A pop-up opens on your provider.
- Sign in with an account whose address is on one of your verified domains.
- The result page shows the email address and the names Tinct received. Nothing else is read — no group, no role.
- Back on the Security page, click Enable.
The test signs nobody in and creates nobody. Its link works once and for ten minutes.
Addresses on your verified domains are now sent to your provider by default, while their password and social sign-in still work. When you are confident, go on to Require SSO in your workspace.
Signing certificates
The Signing certificates card holds what responses from your provider are verified with.
- A certificate must be an RSA key of at least 2048 bits (or an elliptic-curve key of at least 256 bits), itself signed with SHA-256 or stronger, and inside its validity. SHA-1 is refused.
- Paste the PEM text or drop the file — a binary
.ceris converted for you. - Each row shows the subject, the validity dates, a SHA-256 fingerprint to check against your provider, and a badge: Valid, Expires in N days, Expired or Not valid yet.
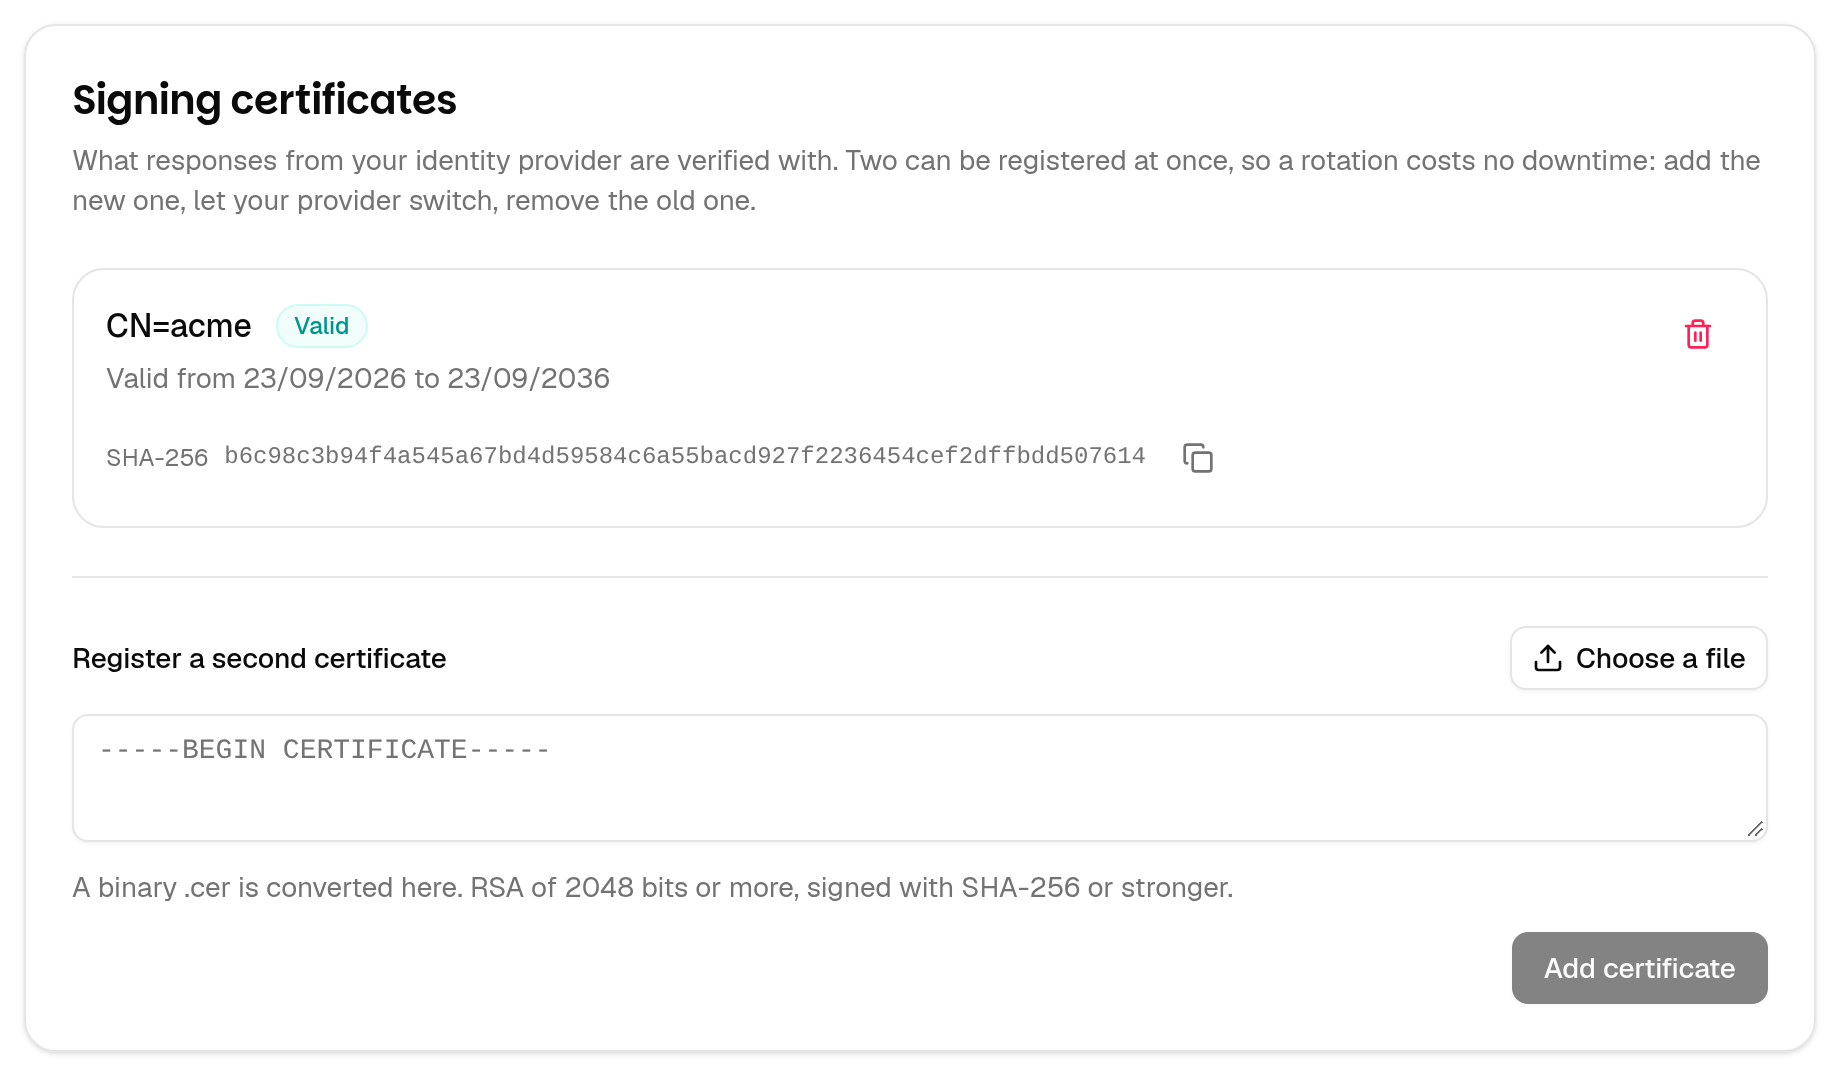
Rotate without downtime
A connection holds two certificates at once, which is exactly what a rotation needs:
- Register your provider's new certificate as the second one. Nothing changes for anybody: both are accepted.
- Let your provider switch to signing with the new one.
- Remove the old one.
💡 Removing the last valid certificate is a change of trust: the connection goes back to draft, single sign-on is switched off and the requirement lifted until a new test sign-in succeeds. Adding a second one never is.
Expiry notices
Your workspace admins are emailed 30, 14, 7 and 1 day before a registered certificate expires — A single sign-on certificate of <workspace> expires on <date>. The email says so when the rotation is already half done, that is when the connection holds another certificate that outlives the one expiring.
When your provider changes its certificates
If you gave a Metadata URL, Tinct re-reads it daily and never applies a change on its own — reading new certificates in is a change of trust. Instead, the card shows a banner and your admins get The single sign-on certificates of <workspace> changed at your identity provider. Click Apply the provider's current certificates when you are ready.
Sign-in started from your provider
By default, Tinct only accepts a response that answers a request it made itself. Turn on Allow sign-in started from the identity provider if you want a Tinct tile in your provider's dashboard to work — at the price of accepting responses nobody here asked for. Leave it off unless you need it.
Good to know
- Encrypted assertions are supported, but only when the response itself is signed: the signature of an encrypted assertion cannot be checked before it is decrypted.
- Encryption algorithms: Tinct accepts an assertion encrypted with RSA-OAEP (key transport) and AES-GCM or AES-CBC (content), which are the defaults of Okta, Microsoft Entra ID and Keycloak. An assertion encrypted with RSA 1.5 or Triple DES is refused, and the sign-in ends on an error page: if your provider lets you choose, keep RSA-OAEP and AES.
- Signing out of Tinct ends the Tinct session only. Tinct does not take part in single logout.
- Your provider asks for the email address again. SAML has no standard way to pass on the address typed on Tinct's sign-in page, so it is not prefilled there. With OpenID Connect, it is.
- Changing the entity ID, the sign-on URL or the certificates sends the connection back to draft. The metadata URL, the attribute names and the IdP-initiated switch do not. Changing the entity ID also makes everyone bind to your provider again at their next sign-in.
Was this helpful?
Still need help? Share an idea